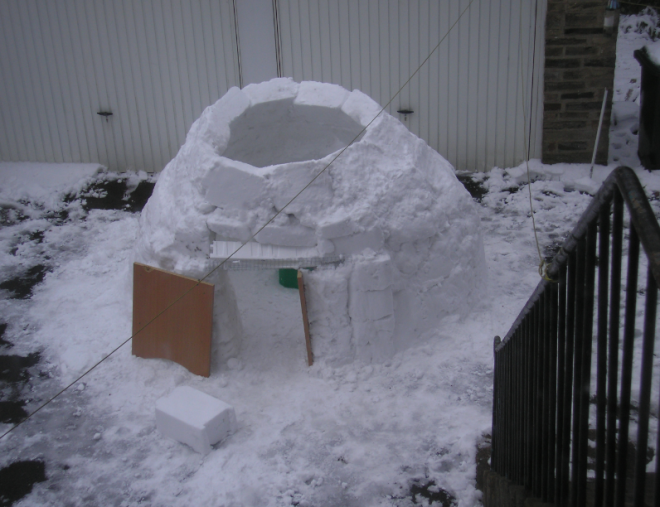
How do you build an igloo? With all the Boxing Day snow we’ve been having, I am going to show you how to build a functional igloo; we built this igloo in our drive in 2013, at a guess it was about 12 feet (3m) in diameter.
We built this igloo that lasted several days (until it melted in some heavy rain) and we were able to camp in it with sleeping bags and roll mats. I always wondered if it was true that igloos were warm and dry inside. I don’t know how it’s possible, but it was actually pretty cozy camping in our igloo!
It took us about 4 hours to make this igloo, mostly because I didn’t have a lot of energy at the time and working on this was manual labour.
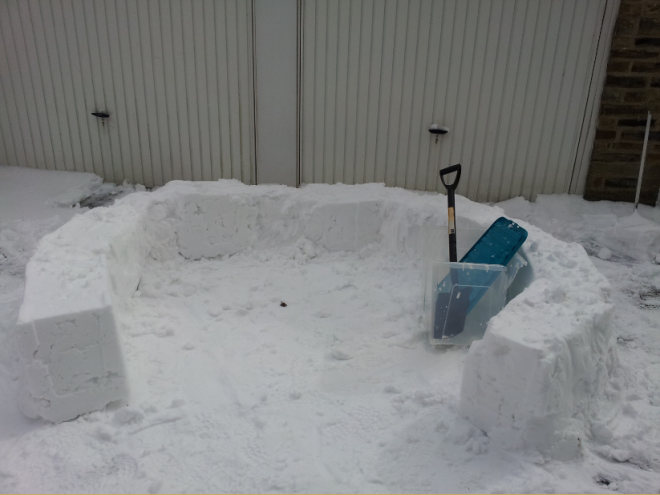
1. Get some large plastic boxes: Recycling boxes or storage boxes will do just fine for igloo building. A packing crate isn’t very good as it’s not very strong and the sides are full of holes so the snow falls out instead of making solid igloo ice blocks.

2. Fill the boxes with snow. Pack the snow down in the box to make giant bricks of ice. You will need to repeat steps 2 and 3 a lot to make an igloo.

3. Tip the boxes upside down in a circle (leave room for an igloo door) and pat the bottom to get the snow-bricks out (see picture):

4. Once you have a complete layer, do the same above – but don’t line the bricks up (think about how brick walls are built), and make sure the ice blocks are facing slightly inwards so your bricks eventually meet at the top.

5. At the top of the igloo, you have two choices – some people prefer to build a capstone out of ice, to stop everything from falling apart. Otherwise, leave a hole in the top to let air in. We left a hole in the top of ours.

6. We used polystyrene and wire mesh to support the door of our igloo because the size of our ice blocks (and the ambient temperature being only -5 or so) meant the whole structure may have collapsed if we hadn’t used any support. Smaller boxes (than 70 litres) or hardening the blocks of ice using cold water would have both prevented this problem, but it wasn’t cold enough for water-hardening the ice blocks and they just melted when we tried it. For the amount of time we put into building this igloo, I was very happy to complete it and didn’t worry too much about it being 100% Eskimo-worthy. Whether you end up with a perfect building made only of ice or not, you will feel damn proud when you go inside your finished igloo.

7. Now admire your igloo. Can you sleep in an igloo? Definitely! We camped out in ours with some roll mats and a double sleeping bag and it was surprisingly cosy (although we did this wearing serious layers). It also confused the neighbours which was hilarious.

8. Take plenty of photos and share them with me via Twitter @mamaadventurez so I can see your awesome creations!
How long will it last?
An igloo can last for weeks in the right weather conditions. If it’s dry, snowy and subzero (celsius), your igloo will only give up when it’s been subjected to too much wear and tear. Rain, as we found out with our igloo, will basically kill an igloo.
Does it need a roof cap?
The traditional (i.e. boy scouts) thinking is that you do need one, but leaving the roof open improves ventilation and the shape of an igloo means very little falling snow will actually get in. If you’re concerned about rainfall or snow, you would be best off sticking an umbrella over the top of your igloo.
Making a roof cap that balances properly is a complete faff because you either need to build the bricks higher, and the top is hard to reach from the outside due to the curvature of the igloo, or you need a really big, solid and sturdy block of packed snow which is difficult to make without the right shape of container.
We left ours open at the top and found it warm enough but not stuffy at all, because the air was able to circulate.
Can you really sleep in an igloo?
It’s worth noting we stayed in ours in dry conditions in temperatures of -3, you may find the blocks are prone to becoming weakened in warmer temperatures, especially once you hit positive numbers on the thermometer.
Have you built an igloo? Share your igloo pics with me on Twitter! Who needs an expensive package holiday to Iceland? You can do this in your own front garden!


2 responses to “How to build an igloo”
From the look of it, about half way up we stood the bricks on edge. They took up more space that way and the sloped edge of the box meant that they leaned inwards without us having to shape them. Gaps between bricks were stuffed with snow.
LikeLike
Thanks for adding that, it’ll be helpful to people wanting a more airtight igloo, and I’d clearly forgotten that part! 🙂
LikeLike